Foraging: Difference between revisions
Marblemadmax (talk | contribs) |
|||
| (38 intermediate revisions by 5 users not shown) | |||
| Line 1: | Line 1: | ||
'''Foraging''' is collecting resources directly from the ground or trees and bushes. | {{infobox | ||
|image=Foraging Screenshot.png | |||
|width=350px | |||
|description= | |||
|type={{inlineIcon|Foraging|iconOnly}} [[:Category:Activities|Activity]] [[Category:Activities]] | |||
|tool= | |||
|energy={{price|0|energy}} | |||
|friendship={{price|30|friendship}} per Harvest action<br>{{price|60|friendship}} if [[Roles|Foraging Role]] | |||
}}{{cleanup|This article currently refers to Foraging Collection items, whereas the expectation based on the naming convention is that it would refer to the activity - i.e. Foraging Fruit and Herbs, which are impacted by the Companion Bonus}} | |||
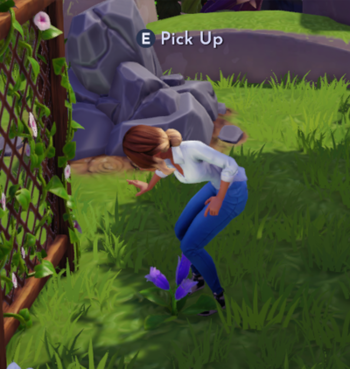
'''Foraging''' is an activity which involves collecting resources directly from the ground, or from trees and bushes. The Player can Hang Out with a Villager assigned the '''Foraging''' [[Roles|Role]] to increase the number of fruits and wild crops collected when harvesting. | |||
Each area of [[The Valley]] has unique resources available to forage. After collecting a foraged item for the first time it will highlight as completed in the 'Foraging' tab of the '''Collection''' | Each area of [[The Valley]] has unique resources available to forage. After collecting a foraged item for the first time it will highlight as completed in the 'Foraging' tab of the '''Collection'''. | ||
Foraged items can be [[Cooking|cooked into meals]], consumed to regain [[Energy]], sold for [[Star Coins]], or [[Gifts|gifted]] to [[Characters|villagers]] to raise [[Friendship]]. Non-edible foraged items can be used to [[Crafting|craft items]]. | |||
===Energy Cost=== | |||
:''Main article: [[Energy]]'' | |||
It does not require any [[energy]] to Harvest or Pick Up items. | |||
===Villager Companions=== | ===Villager Companions=== | ||
When reaching level 2 [[Friendship]] with a [[Characters| | When reaching level 2 [[Friendship]] with a [[Characters|Villager]], they can be assigned a [[Roles|Role]]. Villagers who have been assigned the '''Foraging Role''' will gain extra [[Friendship]] when collecting foraged materials. They also have a chance to drop extra foraged materials when harvesting wild crops and fruits while they're following. Extra materials they produce will be dropped on the ground, and can be picked up by running over them. These bonuses only apply to items with the '''Harvest''' interaction label (e.g. Fruits, Mushrooms, Spices), not items with the '''Pick Up''' interaction label (e.g. Wood, Flowers). | ||
Each level of friendship increases the rate which extra materials will drop. It's not only effective for leveling up [[Friendship]] with these characters, but extremely helpful for offering bonus materials when foraging. Be sure to always bring a Companion along when foraging! | Each level of friendship increases the rate which extra materials will drop. It's not only effective for leveling up [[Friendship]] with these characters, but extremely helpful for offering bonus materials when foraging. Be sure to always bring a Companion along when foraging! | ||
| Line 11: | Line 26: | ||
A variety of resources can be found throughout the Valley - many which are unique to specific biomes. Some of these materials can be refined into higher level materials, which may be a component of a crafting recipe. | A variety of resources can be found throughout the Valley - many which are unique to specific biomes. Some of these materials can be refined into higher level materials, which may be a component of a crafting recipe. | ||
{| class='wikitable sortable' | {| class='wikitable sortable' id='recipe-table' | ||
! class="unsortable" | Image | ! class="unsortable" | Image | ||
!Name | !Name | ||
!Sell Price | !Sell Price | ||
!Locations | !Locations | ||
| Line 20: | Line 34: | ||
|[[File:Clay.png|center|50px|link=Clay]] | |[[File:Clay.png|center|50px|link=Clay]] | ||
|[[Clay]] | |[[Clay]] | ||
|{{price|20}} | |{{price|20}} | ||
| | | | ||
{{inlineIcon|Kristoff's Stall|size=20|link=Kristoff's Stall}}<br> | |||
{{inlineIcon|Digging|size=20|link=Digging}}<br> | |||
:{{name|Glade of Trust}}<br> | :{{name|Glade of Trust}}<br> | ||
:{{name|Sunlit Plateau}}<br> | :{{name|Sunlit Plateau}}<br> | ||
:{{name|Forgotten Lands}} | :{{name|Forgotten Lands}} | ||
{{inlineIcon|Shovel|iconOnly|size=20|link=Shovel}} Removing [[Small Wildebeest Bones|Small]] and [[Large Wildebeest Bones|Big Wildebeest Bones]] | |||
|- | |- | ||
|[[File:Coal Ore.png|center|50px|link=Coal Ore]] | |[[File:Coal Ore.png|center|50px|link=Coal Ore]] | ||
|[[Coal Ore]] | |[[Coal Ore]] | ||
|{{price|5}} | |{{price|5}} | ||
| | | | ||
{{inlineIcon|Kristoff's Stall|size=20|link=Kristoff's Stall}}<br> | |||
{{inlineIcon|Mining|size=20|link=Mining}} | |||
:All Biomes | |||
{{inlineIcon|Night Thorns|iconOnly|size=20|link=Night Thorn}} Removing [[Night Thorn]]s | |||
|- | |- | ||
|[[File:Cotton.png|center|50px|link=Cotton]] | |[[File:Cotton.png|center|50px|link=Cotton]] | ||
|[[Cotton]] | |[[Cotton]] | ||
|{{price|37}} | |{{price|37}} | ||
| | | | ||
{{inlineIcon|Goofy's Stall|size=20|link=Goofy's Stall}} ([[Cotton Seed]] only)<br> | |||
:{{name|Sunlit Plateau}} | :{{name|Sunlit Plateau}} | ||
|- | |- | ||
|[[File:Crystal.png|center|50px|link=Crystal]] | |[[File:Crystal.png|center|50px|link=Crystal]] | ||
|[[Crystal]] | |[[Crystal]] | ||
|{{price|30}} | |{{price|30}} | ||
| | | | ||
{{inlineIcon|Mining|size=20|link=Mining}}<br> | |||
:{{name|Forgotten Lands}} | :{{name|Forgotten Lands}} | ||
{{inlineIcon|Critters|iconOnly|size=20|link=Critters}} Feeding [[Critters|Sunbirds]] liked foods | |||
|- | |- | ||
|[[File:Dark Wood.png|center|50px|link=Dark Wood]] | |[[File:Dark Wood.png|center|50px|link=Dark Wood]] | ||
|[[Dark Wood]] | |[[Dark Wood]] | ||
|{{price|50}} | |{{price|50}} | ||
| | | | ||
{{inlineIcon|Foraging|size=20|link=Foraging}}<br> | |||
:{{name|Forgotten Lands}} | :{{name|Forgotten Lands}} | ||
|- | |- | ||
|[[File:Dream Shard.png|center|50px|link=Dream Shard]] | |[[File:Dream Shard.png|center|50px|link=Dream Shard]] | ||
|[[Dream Shard]] | |[[Dream Shard]] | ||
|n/a | |n/a | ||
| | | | ||
{{inlineIcon|Digging|iconOnly|size=20|link=Digging}} [[Digging]] [[Sparkling Hole]]s<br> | |||
{{inlineIcon|Critters|iconOnly|size=20|link=Critters}} Feeding [[Critters]]<br> | |||
{{inlineIcon|Night Thorns|iconOnly|size=20|link=Night Thorn}} Removing [[Night Thorn]]s | |||
|- | |- | ||
|[[File:Dry Wood.png|center|50px|link=Dry Wood]] | |[[File:Dry Wood.png|center|50px|link=Dry Wood]] | ||
|[[Dry Wood]] | |[[Dry Wood]] | ||
|{{price|25}} | |{{price|25}} | ||
| | | | ||
{{inlineIcon|Kristoff's Stall|size=20|link=Kristoff's Stall}}<br> | |||
{{inlineIcon|Foraging|size=20|link=Foraging}}<br> | |||
:{{name|Sunlit Plateau}}<br> | :{{name|Sunlit Plateau}}<br> | ||
:{{name|Frosted Heights}}<br> | :{{name|Frosted Heights}}<br> | ||
| Line 84: | Line 94: | ||
|[[File:Gold Nugget.png|center|50px|link=Gold Nugget]] | |[[File:Gold Nugget.png|center|50px|link=Gold Nugget]] | ||
|[[Gold Nugget]] | |[[Gold Nugget]] | ||
|{{price|20}} | |{{price|20}} | ||
| | | | ||
{{inlineIcon|Mining|size=20|link=Mining}}<br> | |||
:{{name|Frosted Heights}}<br> | :{{name|Frosted Heights}}<br> | ||
:{{name|Sunlit Plateau}}<br> | :{{name|Sunlit Plateau}}<br> | ||
| Line 95: | Line 104: | ||
|[[File:Hardwood.png|center|50px|link=Hardwood]] | |[[File:Hardwood.png|center|50px|link=Hardwood]] | ||
|[[Hardwood]] | |[[Hardwood]] | ||
|{{price|10}} | |{{price|10}} | ||
| | | | ||
{{inlineIcon|Kristoff's Stall|size=20|link=Kristoff's Stall}}<br> | |||
{{inlineIcon|Foraging|size=20|link=Foraging}}<br> | |||
:{{name|Forest of Valor}}<br> | :{{name|Forest of Valor}}<br> | ||
:{{name|Glade of Trust}}<br> | :{{name|Glade of Trust}}<br> | ||
:{{name|Sunlit Plateau}}<br> | :{{name|Sunlit Plateau}}<br> | ||
:{{name|Frosted Heights}} | :{{name|Frosted Heights}} | ||
{{inlineIcon|Shovel|iconOnly|size=20|link=Shovel}} Removing [[Large Tree Stump|Large Tree Stumps]] | |||
|- | |- | ||
|[[File:Iron Ore.png|center|50px|link=Iron Ore]] | |[[File:Iron Ore.png|center|50px|link=Iron Ore]] | ||
|[[Iron Ore]] | |[[Iron Ore]] | ||
|{{price|10}} | |{{price|10}} | ||
| | | | ||
{{inlineIcon|Mining|size=20|link=Mining}}<br> | |||
:{{name|Forest of Valor}}<br> | :{{name|Forest of Valor}}<br> | ||
:{{name|Glade of Trust}}<br> | :{{name|Glade of Trust}}<br> | ||
| Line 120: | Line 128: | ||
|[[File:Night Shard.png|center|50px|link=Night Shard]] | |[[File:Night Shard.png|center|50px|link=Night Shard]] | ||
|[[Night Shard]] | |[[Night Shard]] | ||
|n/a | |n/a | ||
| | | | ||
{{inlineIcon|Digging|iconOnly|size=20|link=Digging}} [[Digging]] [[Sparkling Hole]]s<br> | |||
|- | |- | ||
|[[File:Pebbles.png|center|50px|link=Pebbles]] | |[[File:Pebbles.png|center|50px|link=Pebbles]] | ||
|[[Pebbles]] | |[[Pebbles]] | ||
|{{price|10}} | |{{price|10}} | ||
| | | | ||
{{inlineIcon|Kristoff's Stall|size=20|link=Kristoff's Stall}}<br> | |||
{{inlineIcon|Digging|size=20|link=Digging}}<br> | |||
:{{name|Dazzle Beach}}<br> | :{{name|Dazzle Beach}}<br> | ||
:{{name|Forest of Valor}}<br> | :{{name|Forest of Valor}}<br> | ||
:{{name|Sunlit Plateau}}<br> | :{{name|Sunlit Plateau}}<br> | ||
:{{name|Forgotten Lands}} | :{{name|Forgotten Lands}} | ||
|- | |||
|[[File:Pixel Shard.png|center|50px|link=Pixel Shard]] | |||
|[[Pixel Shard]] | |||
|n/a | |||
|[[Multiplayer]] | |||
|- | |||
|[[File:Red Algae.png|center|50px|link=Red Algae]] | |||
|[[Red Algae]] | |||
|{{price|150}} | |||
|{{inlineIcon|Fishing|size=20|link=Fishing}} | |||
:All Biomes | |||
|- | |- | ||
|[[File:Rich Soil.png|center|50px|link=Rich Soil]] | |[[File:Rich Soil.png|center|50px|link=Rich Soil]] | ||
|[[Rich Soil]] | |[[Rich Soil]] | ||
|{{price|25}} | |{{price|25}} | ||
| | | | ||
{{inlineIcon|Gardening|iconOnly|size=20|link=Gardening}} [[Gardening|Harvesting Crops]]<br> | |||
|- | |- | ||
|[[File:Sand.png|center|50px|link=Sand]] | |[[File:Sand.png|center|50px|link=Sand]] | ||
|[[Sand]] | |[[Sand]] | ||
|{{price|8}} | |{{price|8}} | ||
| | | | ||
{{inlineIcon|Kristoff's Stall|size=20|link=Kristoff's Stall}}<br> | |||
{{inlineIcon|Digging|size=20|link=Digging}}<br> | |||
:{{name|Dazzle Beach}}<br> | :{{name|Dazzle Beach}}<br> | ||
{{inlineIcon|Pickaxe|iconOnly|size=20|link=Pickaxe}} Removing [[Small Sea Debris|Small]] and [[Large Sea Debris|Large Sea Debris]] | |||
|- | |- | ||
|[[File:Snowball.png|center|50px|link=Snowball]] | |[[File:Snowball.png|center|50px|link=Snowball]] | ||
|[[Snowball]] | |[[Snowball]] | ||
|{{price|25}} | |{{price|25}} | ||
| | | | ||
{{inlineIcon|Kristoff's Stall|size=20|link=Kristoff's Stall}}<br> | |||
{{inlineIcon|Digging|size=20|link=Digging}}<br> | |||
:{{name|Frosted Heights}} | :{{name|Frosted Heights}} | ||
{{inlineIcon|Pickaxe|iconOnly|size=20|link=Pickaxe}} Removing [[Ice Block|Small]] and [[Huge Ice Block|Large Ice Blocks]] | |||
|- | |- | ||
|[[File:Softwood.png|center|50px|link=Softwood]] | |[[File:Softwood.png|center|50px|link=Softwood]] | ||
|[[Softwood]] | |[[Softwood]] | ||
|{{price|5}} | |{{price|5}} | ||
| | | | ||
{{inlineIcon|Kristoff's Stall|size=20|link=Kristoff's Stall}}<br> | |||
{{inlineIcon|Foraging|size=20|link=Foraging}}<br> | |||
:{{name|Plaza}}<br> | :{{name|Plaza}}<br> | ||
:{{name|Peaceful Meadow}}<br> | :{{name|Peaceful Meadow}}<br> | ||
:{{name|Forest of Valor}}<br> | :{{name|Forest of Valor}}<br> | ||
:{{name|Glade of Trust}} | :{{name|Glade of Trust}} | ||
{{inlineIcon|Shovel|iconOnly|size=20|link=Shovel}} Removing [[Small Tree Stump|Small]] and [[Large Tree Stump|Large Tree Stumps]] | |||
|- | |- | ||
|[[File:Soil.png|center|50px|link=Soil]] | |[[File:Soil.png|center|50px|link=Soil]] | ||
|[[Soil]] | |[[Soil]] | ||
|{{price|3}} | |{{price|3}} | ||
| | | | ||
{{inlineIcon|Digging|size=20|link=Digging}}<br> | |||
:{{name|Plaza}}<br> | :{{name|Plaza}}<br> | ||
:{{name|Peaceful Meadow}}<br> | :{{name|Peaceful Meadow}}<br> | ||
| Line 191: | Line 205: | ||
|[[File:Stone.png|center|50px|link=Stone]] | |[[File:Stone.png|center|50px|link=Stone]] | ||
|[[Stone]] | |[[Stone]] | ||
|{{price|2}} | |{{price|2}} | ||
| | | | ||
< | {{inlineIcon|Kristoff's Stall|size=20|link=Kristoff's Stall}}<br> | ||
< | {{inlineIcon|Mining|size=20|link=Mining}}<br> | ||
: | :All Biomes<br> | ||
{{inlineIcon|Pickaxe|iconOnly|size=20|link=Pickaxe}} Removing [[Small Rock|Small]] and [[Large Rock|Big Rocks]] | |||
|- | |||
|[[File:Amber.png|center|50px|link=Amber]] | |||
|[[Amber]] | |||
|{{price|30}} | |||
| | |||
{{inlineIcon|Digging|size=20|link=Digging}}<br> | |||
:{{name|Wild Tangle|link=Wild Tangle{{!}}The Grasslands}}<br> | |||
:{{name|Wild Tangle|link=Wild Tangle{{!}}The Promenade}}<br> | |||
:{{name|Wild Tangle|link=Wild Tangle{{!}}The Grove}}<br> | |||
:{{name|Wild Tangle|link=Wild Tangle{{!}}The Lagoon}} | |||
|- | |||
|[[File:Bones.png|center|50px|link=Bones]] | |||
|[[Bones]] | |||
|{{price|20}} | |||
| | |||
{{inlineIcon|Digging|size=20|link=Digging}}<br> | |||
:{{name|Glittering Dunes|link=Glittering Dunes}} | |||
{{inlineIcon|Fishing|size=20|link=Fishing}}<br> | |||
:{{name|Glittering Dunes|link=Glittering Dunes{{!}}The Plains}}<br> | |||
:{{name|Glittering Dunes|link=Glittering Dunes{{!}}The Wastes}}<br> | |||
:{{name|Glittering Dunes|link=Glittering Dunes{{!}}The Borderlands}} | |||
|- | |||
|[[File:Copper.png|center|50px|link=Copper]] | |||
|[[Copper]] | |||
|{{price|15}} | |||
| | |||
{{inlineIcon|Mining|size=20|link=Mining}}<br> | |||
:{{name|Eternity Isle}} | |||
|- | |||
|[[File:Oasis Glass.png|center|50px|link=Oasis Glass]] | |||
|[[Oasis Glass]] | |||
|{{price|20}} | |||
| | |||
{{inlineIcon|Digging|size=20|link=Digging}}<br> | |||
:{{name|Glittering Dunes|link=Glittering Dunes{{!}}The Plains}}<br> | |||
:{{name|Glittering Dunes|link=Glittering Dunes{{!}}The Wastes}}<br> | |||
:{{name|Glittering Dunes|link=Glittering Dunes{{!}}The Oasis}}<br> | |||
:{{name|Glittering Dunes|link=Glittering Dunes{{!}}The Borderlands}} | |||
|- | |||
|[[File:Pearl.png|center|50px|link=Pearl]] | |||
|[[Pearl]] | |||
|{{price|10}} | |||
| | |||
{{inlineIcon|Digging|size=20|link=Digging}}<br> | |||
:{{name|Ancient's Landing|link=Ancient's Landing{{!}}The Docks}}<br> | |||
:{{name|Ancient's Landing|link=Ancient's Landing{{!}}The Courtyard}}<br> | |||
:{{name|Ancient's Landing|link=Ancient's Landing{{!}}The Overlook}}<br> | |||
:{{name|Ancient's Landing|link=Ancient's Landing{{!}}The Ruins}} | |||
|- | |||
|[[File:Plastic Scrap.png|center|50px|link=Plastic Scrap]] | |||
|[[Plastic Scrap]] | |||
|{{price|10}} | |||
| | |||
{{inlineIcon|Fishing|size=20|link=Fishing}}<br> | |||
:{{name|Eternity Isle}} | |||
|- | |||
|[[File:Quartz.png|center|50px|link=Quartz]] | |||
|[[Quartz]] | |||
|{{price|20}} | |||
| | |||
{{inlineIcon|Mining|size=20|link=Mining}}<br> | |||
:{{name|Ancient's Landing|link=Ancient's Landing{{!}}The Docks}}<br> | |||
:{{name|Ancient's Landing|link=Ancient's Landing{{!}}The Courtyard}}<br> | |||
:{{name|Ancient's Landing|link=Ancient's Landing{{!}}The Overlook}}<br> | |||
:{{name|Ancient's Landing|link=Ancient's Landing{{!}}The Ruins}} | |||
|- | |||
|[[File:Scales.png|center|50px|link=Scales]] | |||
|[[Scales]] | |||
|{{price|20}} | |||
| | |||
{{inlineIcon|Fishing|size=20|link=Fishing}}<br> | |||
:{{name|Glittering Dunes|link=Glittering Dunes{{!}}The Oasis}} | |||
|- | |||
|[[File:Tin.png|center|50px|link=Tin]] | |||
|[[Tin]] | |||
|{{price|25}} | |||
| | |||
{{inlineIcon|Mining|size=20|link=Mining}}<br> | |||
:{{name|Glittering Dunes|link=Glittering Dunes{{!}}The Plains}}<br> | |||
:{{name|Glittering Dunes|link=Glittering Dunes{{!}}The Wastes}}<br> | |||
:{{name|Glittering Dunes|link=Glittering Dunes{{!}}The Oasis}}<br> | |||
:{{name|Glittering Dunes|link=Glittering Dunes{{!}}The Borderlands}} | |||
|- | |||
|[[File:Tropical Wood.png|center|50px|link=Tropical Wood]] | |||
|[[Tropical Wood]] | |||
|{{price|40}} | |||
| | |||
{{inlineIcon|Foraging|size=20|link=Foraging}}<br> | |||
:{{name|Wild Tangle|link=Wild Tangle{{!}}The Grasslands}} | |||
|- | |||
|[[File:Zinc.png|center|50px|link=Zinc]] | |||
|[[Zinc]] | |||
|{{price|30}} | |||
| | |||
{{inlineIcon|Mining|size=20|link=Mining}}<br> | |||
:{{name|Wild Tangle|link=Wild Tangle{{!}}The Grasslands}}<br> | |||
:{{name|Wild Tangle|link=Wild Tangle{{!}}The Promenade}}<br> | |||
:{{name|Wild Tangle|link=Wild Tangle{{!}}The Grove}}<br> | |||
:{{name|Wild Tangle|link=Wild Tangle{{!}}The Lagoon}} | |||
|} | |} | ||
| Line 203: | Line 315: | ||
Flowers can be found in each biome growing wild on the ground. Each flower is unique to only one biome. | Flowers can be found in each biome growing wild on the ground. Each flower is unique to only one biome. | ||
The distribution of flowers grown in each biome is not random; there is a set number of each type that will grow. Therefore, if you wish to collect a certain type of flower, you only need to pick that flower type in order for more of that type to spawn. | |||
[[Beast's Greenhouse]] is an unlockable stall which supports flower gathering. It provides free flowers to collect at no cost. | |||
===Flower Types=== | |||
{| class='wikitable sortable' id='recipe-table' | {| class='wikitable sortable' id='recipe-table' | ||
! class="unsortable" | Image | ! class="unsortable" | Image | ||
!Name | !Name | ||
!Sell Price | !Sell Price | ||
!Max Spawns<ref name="shared">Maximum spawn count is shared across all possible locations where flowers can appear.</ref> | |||
!Location | !Location | ||
|- | |- | ||
|[[File:Black Passion Lily.png|50px|center|link=Black Passion Lily]] | |[[File:Black Passion Lily.png|50px|center|link=Black Passion Lily]] | ||
|[[Black Passion Lily]] | |[[Black Passion Lily]] | ||
|{{price|79}} | |{{price|79}} | ||
|2 | |||
|{{name|Frosted Heights}} | |{{name|Frosted Heights}} | ||
|- | |- | ||
|[[File:Blue Falling Penstemon.png|50px|center|link=Blue Falling Penstemon]] | |[[File:Blue Falling Penstemon.png|50px|center|link=Blue Falling Penstemon]] | ||
|[[Blue Falling Penstemon]] | |[[Blue Falling Penstemon]] | ||
|{{price|23}} | |{{price|23}} | ||
|4 | |||
|{{name|Plaza}} | |{{name|Plaza}} | ||
|- | |- | ||
|[[File:Blue Hydrangea.png|50px|center|link=Blue Hydrangea]] | |[[File:Blue Hydrangea.png|50px|center|link=Blue Hydrangea]] | ||
|[[Blue Hydrangea]] | |[[Blue Hydrangea]] | ||
|{{price|28}} | |{{price|28}} | ||
|4 | |||
|{{name|Dazzle Beach}} | |{{name|Dazzle Beach}} | ||
|- | |- | ||
|[[File:Blue Marsh Milkweed.png|50px|center|link=Blue Marsh Milkweed]] | |[[File:Blue Marsh Milkweed.png|50px|center|link=Blue Marsh Milkweed]] | ||
|[[Blue Marsh Milkweed]] | |[[Blue Marsh Milkweed]] | ||
|{{price|48}} | |{{price|48}} | ||
|3 | |||
|{{name|Glade of Trust}} | |{{name|Glade of Trust}} | ||
|- | |- | ||
|[[File:Blue Passion Lily.png|50px|center|link=Blue Passion Lily]] | |[[File:Blue Passion Lily.png|50px|center|link=Blue Passion Lily]] | ||
|[[Blue Passion Lily]] | |[[Blue Passion Lily]] | ||
|{{price|56}} | |{{price|56}} | ||
|3 | |||
|{{name|Frosted Heights}} | |{{name|Frosted Heights}} | ||
|- | |- | ||
|[[File:Blue Star Lily.png|50px|center|link=Blue Star Lily]] | |[[File:Blue Star Lily.png|50px|center|link=Blue Star Lily]] | ||
|[[Blue Star Lily]] | |[[Blue Star Lily]] | ||
|{{price|30}} | |{{price|30}} | ||
|4 | |||
|{{name|Forest of Valor}} | |{{name|Forest of Valor}} | ||
|- | |- | ||
|[[File:Dandelion.png|50px|center|link=Dandelion]] | |[[File:Dandelion.png|50px|center|link=Dandelion]] | ||
|[[Dandelion]] | |[[Dandelion]] | ||
|{{price|23}} | |{{price|23}} | ||
|4 | |||
|{{name|Plaza}} | |{{name|Plaza}} | ||
|- | |- | ||
|[[File:Green Passion Lily.png|50px|center|link=Green Passion Lily]] | |[[File:Green Passion Lily.png|50px|center|link=Green Passion Lily]] | ||
|[[Green Passion Lily]] | |[[Green Passion Lily]] | ||
|{{price|28}} | |{{price|28}} | ||
|6 | |||
|{{name|Frosted Heights}} | |{{name|Frosted Heights}} | ||
|- | |- | ||
|[[File:Green Rising Penstemon.png|50px|center|link=Green Rising Penstemon]] | |[[File:Green Rising Penstemon.png|50px|center|link=Green Rising Penstemon]] | ||
|[[Green Rising Penstemon]] | |[[Green Rising Penstemon]] | ||
|{{price|35}} | |{{price|35}} | ||
|3 | |||
|{{name|Peaceful Meadow}} | |{{name|Peaceful Meadow}} | ||
|- | |- | ||
|[[File:Orange & Red Marsh Milkweed.png|50px|center|link=Orange & Red Marsh Milkweed]] | |[[File:Orange & Red Marsh Milkweed.png|50px|center|link=Orange & Red Marsh Milkweed]] | ||
|[[Orange & Red Marsh Milkweed]] | |[[Orange & Red Marsh Milkweed]] | ||
|{{price|66}} | |{{price|66}} | ||
|2 | |||
|{{name|Glade of Trust}} | |{{name|Glade of Trust}} | ||
|- | |- | ||
|[[File:Orange Houseleek.png|50px|center|link=Orange Houseleek]] | |[[File:Orange Houseleek.png|50px|center|link=Orange Houseleek]] | ||
|[[Orange Houseleek]] | |[[Orange Houseleek]] | ||
|{{price|52}} | |{{price|52}} | ||
|3 | |||
|{{name|Sunlit Plateau}} | |{{name|Sunlit Plateau}} | ||
|- | |- | ||
|[[File:Orange Marsh Milkweed.png|50px|center|link=Orange Marsh Milkweed]] | |[[File:Orange Marsh Milkweed.png|50px|center|link=Orange Marsh Milkweed]] | ||
|[[Orange Marsh Milkweed]] | |[[Orange Marsh Milkweed]] | ||
|{{price|33}} | |{{price|33}} | ||
|4 | |||
|{{name|Glade of Trust}} | |{{name|Glade of Trust}} | ||
|- | |- | ||
|[[File:Orange Nasturtium.png|50px|center|link=Orange Nasturtium]] | |[[File:Orange Nasturtium.png|50px|center|link=Orange Nasturtium]] | ||
|[[Orange Nasturtium]] | |[[Orange Nasturtium]] | ||
|{{price|60}} | |{{price|60}} | ||
|3 | |||
|{{name|Forgotten Lands}} | |{{name|Forgotten Lands}} | ||
|- | |- | ||
|[[File:Orange Star Lily.png|50px|center|link=Orange Star Lily]] | |[[File:Orange Star Lily.png|50px|center|link=Orange Star Lily]] | ||
|[[Orange Star Lily]] | |[[Orange Star Lily]] | ||
|{{price|43}} | |{{price|43}} | ||
|3 | |||
|{{name|Forest of Valor}} | |{{name|Forest of Valor}} | ||
|- | |- | ||
|[[File:Pink Bromeliad.png|50px|center|link=Pink Bromeliad]] | |[[File:Pink Bromeliad.png|50px|center|link=Pink Bromeliad]] | ||
|[[Pink Bromeliad]] | |[[Pink Bromeliad]] | ||
|{{price|27}} | |{{price|27}} | ||
|6 | |||
|{{name|Sunlit Plateau}} | |{{name|Sunlit Plateau}} | ||
|- | |- | ||
|[[File:Pink Houseleek.png|50px|center|link=Pink Houseleek]] | |[[File:Pink Houseleek.png|50px|center|link=Pink Houseleek]] | ||
|[[Pink Houseleek]] | |[[Pink Houseleek]] | ||
|{{price|35}} | |{{price|35}} | ||
|4 | |||
|{{name|Sunlit Plateau}} | |{{name|Sunlit Plateau}} | ||
|- | |- | ||
|[[File:Pink Hydrangea.png|50px|center|link=Pink Hydrangea]] | |[[File:Pink Hydrangea.png|50px|center|link=Pink Hydrangea]] | ||
|[[Pink Hydrangea]] | |[[Pink Hydrangea]] | ||
|{{price|22}} | |{{price|22}} | ||
|6 | |||
|{{name|Dazzle Beach}} | |{{name|Dazzle Beach}} | ||
|- | |- | ||
|[[File:Purple Bell Flower.png|50px|center|link=Purple Bell Flower]] | |[[File:Purple Bell Flower.png|50px|center|link=Purple Bell Flower]] | ||
|[[Purple Bell Flower]] | |[[Purple Bell Flower]] | ||
|{{price|30}} | |{{price|30}} | ||
|4 | |||
|{{name|Forest of Valor}} | |{{name|Forest of Valor}} | ||
|- | |- | ||
|[[File:Purple Falling Penstemon.png|50px|center|link=Purple Falling Penstemon]] | |[[File:Purple Falling Penstemon.png|50px|center|link=Purple Falling Penstemon]] | ||
|[[Purple Falling Penstemon]] | |[[Purple Falling Penstemon]] | ||
|{{price|23}} | |{{price|23}} | ||
|4 | |||
|{{name|Plaza}} | |{{name|Plaza}} | ||
|- | |- | ||
|[[File:Purple Hydrangea.png|50px|center|link=Purple Hydrangea]] | |[[File:Purple Hydrangea.png|50px|center|link=Purple Hydrangea]] | ||
|[[Purple Hydrangea]] | |[[Purple Hydrangea]] | ||
|{{price|39}} | |{{price|39}} | ||
|3 | |||
|{{name|Dazzle Beach}} | |{{name|Dazzle Beach}} | ||
|- | |- | ||
|[[File:Purple Impatiens.png|50px|center|link=Purple Impatiens]] | |[[File:Purple Impatiens.png|50px|center|link=Purple Impatiens]] | ||
|[[Purple Impatiens]] | |[[Purple Impatiens]] | ||
|{{price|40}} | |{{price|40}} | ||
|4 | |||
|{{name|Forgotten Lands}} | |{{name|Forgotten Lands}} | ||
|- | |- | ||
|[[File:Purple Marsh Milkweed.png|50px|center|link=Purple Marsh Milkweed]] | |[[File:Purple Marsh Milkweed.png|50px|center|link=Purple Marsh Milkweed]] | ||
|[[Purple Marsh Milkweed]] | |[[Purple Marsh Milkweed]] | ||
|{{price|25}} | |{{price|25}} | ||
|6 | |||
|{{name|Glade of Trust}} | |{{name|Glade of Trust}} | ||
|- | |- | ||
|[[File:Purple Rising Penstemon.png|50px|center|link=Purple Rising Penstemon]] | |[[File:Purple Rising Penstemon.png|50px|center|link=Purple Rising Penstemon]] | ||
|[[Purple Rising Penstemon]] | |[[Purple Rising Penstemon]] | ||
|{{price|25}} | |{{price|25}} | ||
|4 | |||
|{{name|Peaceful Meadow}} | |{{name|Peaceful Meadow}} | ||
|- | |- | ||
|[[File:Red Bell Flower.png|50px|center|link=Red Bell Flower]] | |[[File:Red Bell Flower.png|50px|center|link=Red Bell Flower]] | ||
|[[Red Bell Flower]] | |[[Red Bell Flower]] | ||
|{{price|23}} | |{{price|23}} | ||
|6 | |||
|{{name|Forest of Valor}} | |{{name|Forest of Valor}} | ||
|- | |- | ||
|[[File:Red Bromeliad.png|50px|center|link=Red Bromeliad]] | |[[File:Red Bromeliad.png|50px|center|link=Red Bromeliad]] | ||
|[[Red Bromeliad]] | |[[Red Bromeliad]] | ||
|{{price|27}} | |{{price|27}} | ||
|6 | |||
|{{name|Sunlit Plateau}} | |{{name|Sunlit Plateau}} | ||
|- | |- | ||
|[[File:Red Daisy.png|50px|center|link=Red Daisy]] | |[[File:Red Daisy.png|50px|center|link=Red Daisy]] | ||
|[[Red Daisy]] | |[[Red Daisy]] | ||
|{{price|48}} | |{{price|48}} | ||
|2 | |||
|{{name|Peaceful Meadow}} | |{{name|Peaceful Meadow}} | ||
|- | |- | ||
|[[File:Red Falling Penstemon.png|50px|center|link=Red Falling Penstemon]] | |[[File:Red Falling Penstemon.png|50px|center|link=Red Falling Penstemon]] | ||
|[[Red Falling Penstemon]] | |[[Red Falling Penstemon]] | ||
|{{price|18}} | |{{price|18}} | ||
|6 | |||
|{{name|Plaza}} | |{{name|Plaza}} | ||
|- | |- | ||
|[[File:Red Nasturtium.png|50px|center|link=Red Nasturtium]] | |[[File:Red Nasturtium.png|50px|center|link=Red Nasturtium]] | ||
|[[Red Nasturtium]] | |[[Red Nasturtium]] | ||
|{{price|40}} | |{{price|40}} | ||
|4 | |||
|{{name|Forgotten Lands}} | |{{name|Forgotten Lands}} | ||
|- | |- | ||
|[[File:Red Passion Lily.png|50px|center|link=Red Passion Lily]] | |[[File:Red Passion Lily.png|50px|center|link=Red Passion Lily]] | ||
|[[Red Passion Lily]] | |[[Red Passion Lily]] | ||
|{{price|38}} | |{{price|38}} | ||
|4 | |||
|{{name|Frosted Heights}} | |{{name|Frosted Heights}} | ||
|- | |||
|[[File:Red Rose.png|30px|center|link=Red Rose]] | |||
|[[Red Rose]] | |||
|{{price|35}} | |||
| | |||
|{{name|Beast's Greenhouse}} | |||
|- | |- | ||
|[[File:Sunflower.png|50px|center|link=Sunflower]] | |[[File:Sunflower.png|50px|center|link=Sunflower]] | ||
|[[Sunflower]] | |[[Sunflower]] | ||
|{{price|28}} | |{{price|28}} | ||
|4 | |||
|{{name|Dazzle Beach}} | |{{name|Dazzle Beach}} | ||
|- | |- | ||
|[[File:White & Pink Falling Penstemon.png|50px|center|link=White & Pink Falling Penstemon]] | |[[File:White & Pink Falling Penstemon.png|50px|center|link=White & Pink Falling Penstemon]] | ||
|[[White & Pink Falling Penstemon]] | |[[White & Pink Falling Penstemon]] | ||
|{{price|41}} | |{{price|41}} | ||
|2 | |||
|{{name|Plaza}} | |{{name|Plaza}} | ||
|- | |- | ||
|[[File:White & Red Hydrangea.png|50px|center|link=White & Red Hydrangea]] | |[[File:White & Red Hydrangea.png|50px|center|link=White & Red Hydrangea]] | ||
|[[White & Red Hydrangea]] | |[[White & Red Hydrangea]] | ||
|{{price|54}} | |{{price|54}} | ||
|2 | |||
|{{name|Dazzle Beach}} | |{{name|Dazzle Beach}} | ||
|- | |- | ||
|[[File:White Bell Flower.png|50px|center|link=White Bell Flower]] | |[[File:White Bell Flower.png|50px|center|link=White Bell Flower]] | ||
|[[White Bell Flower]] | |[[White Bell Flower]] | ||
|{{price|60}} | |{{price|60}} | ||
|2 | |||
|{{name|Forest of Valor}} | |{{name|Forest of Valor}} | ||
|- | |- | ||
|[[File:White Daisy.png|50px|center|link=White Daisy]] | |[[File:White Daisy.png|50px|center|link=White Daisy]] | ||
|[[White Daisy]] | |[[White Daisy]] | ||
|{{price|25}} | |{{price|25}} | ||
|3 | |||
|{{name|Peaceful Meadow}} | |{{name|Peaceful Meadow}} | ||
|- | |- | ||
|[[File:White Impatiens.png|50px|center|link=White Impatiens]] | |[[File:White Impatiens.png|50px|center|link=White Impatiens]] | ||
|[[White Impatiens]] | |[[White Impatiens]] | ||
|{{price|30}} | |{{price|30}} | ||
|6 | |||
|{{name|Forgotten Lands}} | |{{name|Forgotten Lands}} | ||
|- | |- | ||
|[[File:White Marsh Milkweed.png|50px|center|link=White Marsh Milkweed]] | |[[File:White Marsh Milkweed.png|50px|center|link=White Marsh Milkweed]] | ||
|[[White Marsh Milkweed]] | |[[White Marsh Milkweed]] | ||
|{{price|33}} | |{{price|33}} | ||
|4 | |||
|{{name|Glade of Trust}} | |{{name|Glade of Trust}} | ||
|- | |- | ||
|[[File:White Passion Lily.png|50px|center|link=White Passion Lily]] | |[[File:White Passion Lily.png|50px|center|link=White Passion Lily]] | ||
|[[White Passion Lily]] | |[[White Passion Lily]] | ||
|{{price|38}} | |{{price|38}} | ||
|4 | |||
|{{name|Frosted Heights}} | |{{name|Frosted Heights}} | ||
|- | |- | ||
|[[File:Yellow Bromeliad.png|50px|center|link=Yellow Bromeliad]] | |[[File:Yellow Bromeliad.png|50px|center|link=Yellow Bromeliad]] | ||
|[[Yellow Bromeliad]] | |[[Yellow Bromeliad]] | ||
|{{price|73}} | |{{price|73}} | ||
|2 | |||
|{{name|Sunlit Plateau}} | |{{name|Sunlit Plateau}} | ||
|- | |- | ||
|[[File:Yellow Daisy.png|50px|center|link=Yellow Daisy]] | |[[File:Yellow Daisy.png|50px|center|link=Yellow Daisy]] | ||
|[[Yellow Daisy]] | |[[Yellow Daisy]] | ||
|{{price|20}} | |{{price|20}} | ||
|6 | |||
|{{name|Peaceful Meadow}} | |{{name|Peaceful Meadow}} | ||
|- | |- | ||
|[[File:Yellow Nasturtium.png|50px|center|link=Yellow Nasturtium]] | |[[File:Yellow Nasturtium.png|50px|center|link=Yellow Nasturtium]] | ||
|[[Yellow Nasturtium]] | |[[Yellow Nasturtium]] | ||
|{{price|85}} | |{{price|85}} | ||
|2 | |||
|{{name|Forgotten Lands}} | |{{name|Forgotten Lands}} | ||
|- | |||
|[[File:Black Glass-Like Flowers.png|50x50px|center|link=Black Glass-Like Flowers]] | |||
|[[Black Glass-Like Flowers]] | |||
|{{price|57}} | |||
|2 | |||
| | |||
{{name|Glittering Dunes|link=Glittering Dunes{{!}}The Plains}}<br> | |||
{{name|Glittering Dunes|link=Glittering Dunes{{!}}The Wastes}} | |||
|- | |||
|[[File:Blue Glass-Like Flowers.png|50x50px|center|link=Blue Glass-Like Flowers]] | |||
|[[Blue Glass-Like Flowers]] | |||
|{{price|23}} | |||
|6 | |||
| | |||
{{name|Glittering Dunes|link=Glittering Dunes{{!}}The Plains}}<br> | |||
{{name|Glittering Dunes|link=Glittering Dunes{{!}}The Wastes}} | |||
|- | |||
|[[File:Blue Luminescent Flower.png|50x50px|center|link=Blue Luminescent Flower]] | |||
|[[Blue Luminescent Flower]] | |||
|{{price|26}} | |||
|4 | |||
| | |||
{{name|Ancient's Landing|link=Ancient's Landing{{!}}The Overlook}}<br> | |||
{{name|Ancient's Landing|link=Ancient's Landing{{!}}The Ruins}} | |||
|- | |||
|[[File:Green Fly Trap.png|50x50px|center|link=Green Fly Trap]] | |||
|[[Green Fly Trap]] | |||
|{{price|73}} | |||
|2 | |||
| | |||
{{name|Wild Tangle|link=Wild Tangle{{!}}The Grasslands}}<br> | |||
{{name|Wild Tangle|link=Wild Tangle{{!}}The Promenade}} | |||
|- | |||
|[[File:Green Glass-Like Flowers.png|50x50px|center|link=Green Glass-Like Flowers]] | |||
|[[Green Glass-Like Flowers]] | |||
|{{price|29}} | |||
|4 | |||
| | |||
{{name|Glittering Dunes|link=Glittering Dunes{{!}}The Plains}}<br> | |||
{{name|Glittering Dunes|link=Glittering Dunes{{!}}The Wastes}} | |||
|- | |||
|[[File:Green Luminescent Flower.png|50x50px|center|link=Green Luminescent Flower]] | |||
|[[Green Luminescent Flower]] | |||
|{{price|49}} | |||
|2 | |||
| | |||
{{name|Ancient's Landing|link=Ancient's Landing{{!}}The Overlook}}<br> | |||
{{name|Ancient's Landing|link=Ancient's Landing{{!}}The Ruins}} | |||
|- | |||
|[[File:Orange Bird of Paradise.png|50x50px|center|link=Orange Bird of Paradise]] | |||
|[[Orange Bird of Paradise]] | |||
|{{price|18}} | |||
|6 | |||
| | |||
{{name|Ancient's Landing|link=Ancient's Landing{{!}}The Docks}}<br> | |||
{{name|Ancient's Landing|link=Ancient's Landing{{!}}The Courtyard}} | |||
|- | |||
|[[File:Orange Glass-Like Flowers.png|50x50px|center|link=Orange Glass-Like Flowers]] | |||
|[[Orange Glass-Like Flowers]] | |||
|{{price|41}} | |||
|3 | |||
| | |||
{{name|Glittering Dunes|link=Glittering Dunes{{!}}The Plains}}<br> | |||
{{name|Glittering Dunes|link=Glittering Dunes{{!}}The Wastes}} | |||
|- | |||
|[[File:Orange Pitcher Plant.png|50x50px|center|link=Orange Pitcher Plant]] | |||
|[[Orange Pitcher Plant]] | |||
|{{price|39}} | |||
|4 | |||
| | |||
{{name|Wild Tangle|link=Wild Tangle{{!}}The Grove}}<br> | |||
{{name|Wild Tangle|link=Wild Tangle{{!}}The Lagoon}} | |||
|- | |||
|[[File:Pink Cactus Flower.png|50x50px|center|link=Pink Cactus Flower]] | |||
|[[Pink Cactus Flower]] | |||
|{{price|25}} | |||
|6 | |||
| | |||
{{name|Glittering Dunes|link=Glittering Dunes{{!}}The Oasis}}<br> | |||
{{name|Glittering Dunes|link=Glittering Dunes{{!}}The Borderlands}} | |||
|- | |||
|[[File:Pink Luminescent Flower.png|50x50px|center|link=Pink Luminescent Flower]] | |||
|[[Pink Luminescent Flower]] | |||
|{{price|36}} | |||
|3 | |||
| | |||
{{name|Ancient's Landing|link=Ancient's Landing{{!}}The Overlook}}<br> | |||
{{name|Ancient's Landing|link=Ancient's Landing{{!}}The Ruins}} | |||
|- | |||
|[[File:Purple Cactus Flower.png|50x50px|center|link=Purple Cactus Flower]] | |||
|[[Purple Cactus Flower]] | |||
|{{price|65}} | |||
|2 | |||
| | |||
{{name|Glittering Dunes|link=Glittering Dunes{{!}}The Oasis}}<br> | |||
{{name|Glittering Dunes|link=Glittering Dunes{{!}}The Borderlands}} | |||
|- | |||
|[[File:Purple Fly Trap.png|50x50px|center|link=Purple Fly Trap]] | |||
|[[Purple Fly Trap]] | |||
|{{price|35}} | |||
|4 | |||
| | |||
{{name|Wild Tangle|link=Wild Tangle{{!}}The Grasslands}}<br> | |||
{{name|Wild Tangle|link=Wild Tangle{{!}}The Promenade}} | |||
|- | |||
|[[File:Red Luminescent Flower.png|50x50px|center|link=Red Luminescent Flower]] | |||
|[[Red Luminescent Flower]] | |||
|{{price|20}} | |||
|6 | |||
| | |||
{{name|Ancient's Landing|link=Ancient's Landing{{!}}The Overlook}}<br> | |||
{{name|Ancient's Landing|link=Ancient's Landing{{!}}The Ruins}} | |||
|- | |||
|[[File:Red Pitcher Plant.png|50x50px|center|link=Red Pitcher Plant]] | |||
|[[Red Pitcher Plant]] | |||
|{{price|82}} | |||
|2 | |||
| | |||
{{name|Wild Tangle|link=Wild Tangle{{!}}The Grove}}<br> | |||
{{name|Wild Tangle|link=Wild Tangle{{!}}The Lagoon}} | |||
|- | |||
|[[File:White Bird of Paradise.png|50x50px|center|link=White Bird of Paradise]] | |||
|[[White Bird of Paradise]] | |||
|{{price|23}} | |||
|4 | |||
| | |||
{{name|Ancient's Landing|link=Ancient's Landing{{!}}The Docks}}<br> | |||
{{name|Ancient's Landing|link=Ancient's Landing{{!}}The Courtyard}} | |||
|- | |||
|[[File:White Cactus Flower.png|50x50px|center|link=White Cactus Flower]] | |||
|[[White Cactus Flower]] | |||
|{{price|32}} | |||
|3 | |||
| | |||
{{name|Glittering Dunes|link=Glittering Dunes{{!}}The Oasis}}<br> | |||
{{name|Glittering Dunes|link=Glittering Dunes{{!}}The Borderlands}} | |||
|- | |||
|[[File:Yellow Bird of Paradise.png|50x50px|center|link=Yellow Bird of Paradise]] | |||
|[[Yellow Bird of Paradise]] | |||
|{{price|41}} | |||
|2 | |||
| | |||
{{name|Ancient's Landing|link=Ancient's Landing{{!}}The Docks}}<br> | |||
{{name|Ancient's Landing|link=Ancient's Landing{{!}}The Courtyard}} | |||
|- | |||
|[[File:Yellow Cactus Flower.png|50x50px|center|link=Yellow Cactus Flower]] | |||
|[[Yellow Cactus Flower]] | |||
|{{price|46}} | |||
|4 | |||
| | |||
{{name|Glittering Dunes|link=Glittering Dunes{{!}}The Oasis}}<br> | |||
{{name|Glittering Dunes|link=Glittering Dunes{{!}}The Borderlands}} | |||
|- | |||
|[[File:Yellow Pitcher Plant.png|50x50px|center|link=Yellow Pitcher Plant]] | |||
|[[Yellow Pitcher Plant]] | |||
|{{price|29}} | |||
|6 | |||
| | |||
{{name|Wild Tangle|link=Wild Tangle{{!}}The Grove}}<br> | |||
{{name|Wild Tangle|link=Wild Tangle{{!}}The Lagoon}} | |||
|} | |||
===Flower Spawning=== | |||
After collecting all flowers of a type and color in a biome it can take up to two hours for them to fully respawn. The internal respawn timer for each type of flower is determined by its rarity - with the rarest (2 per biome) on a 1 hour timer and the most common (6 per biome) on a 20 minute timer.<ref>[https://www.youtube.com/c/MintyPlush MintyPlush] - Advanced Flowers Guide - https://www.youtube.com/watch?v=HkBg6ImIlfU</ref> | |||
{|class=wikitable | |||
!Rarity | |||
!Max Spawns | |||
!Internal Timer | |||
!Flowers | |||
|- | |||
|Abundant || 6 Flowers per Biome || 20 minutes | |||
| | |||
{{name|Green Passion Lily}}<br> | |||
{{name|Pink Bromeliad}}<br> | |||
{{name|Pink Hydrangea}}<br> | |||
{{name|Purple Marsh Milkweed}}<br> | |||
{{name|Red Bell Flower}}<br> | |||
{{name|Red Bromeliad}}<br> | |||
{{name|Red Falling Penstemon}}<br> | |||
{{name|White Impatiens}}<br> | |||
{{name|Yellow Daisy}} | |||
|- | |||
|Average || 4 Flowers per Biome || 30 minutes | |||
| | |||
{{name|Blue Falling Penstemon}}<br> | |||
{{name|Blue Hydrangea}}<br> | |||
{{name|Blue Star Lily}}<br> | |||
{{name|Dandelion}}<br> | |||
{{name|Orange Marsh Milkweed}}<br> | |||
{{name|Pink Houseleek}}<br> | |||
{{name|Purple Bell Flower}}<br> | |||
{{name|Purple Falling Penstemon}}<br> | |||
{{name|Purple Impatiens}}<br> | |||
{{name|Purple Rising Penstemon}}<br> | |||
{{name|Red Nasturtium}}<br> | |||
{{name|Red Passion Lily}}<br> | |||
{{name|Sunflower}}<br> | |||
{{name|White Marsh Milkweed}}<br> | |||
{{name|White Passion Lily}} | |||
|- | |||
|Rare || 3 Flowers per Biome || 40 minutes | |||
| | |||
{{name|Blue Marsh Milkweed}}<br> | |||
{{name|Blue Passion Lily}}<br> | |||
{{name|Green Rising Penstemon}}<br> | |||
{{name|Orange Houseleek}}<br> | |||
{{name|Orange Nasturtium}}<br> | |||
{{name|Orange Star Lily}}<br> | |||
{{name|Purple Hydrangea}}<br> | |||
{{name|White Daisy}} | |||
|- | |||
|Ultra Rare || 2 Flowers per Biome || 60 minutes | |||
| | |||
{{name|Black Passion Lily}}<br> | |||
{{name|Orange & Red Marsh Milkweed}}<br> | |||
{{name|Red Daisy}}<br> | |||
{{name|White & Pink Falling Penstemon}}<br> | |||
{{name|White & Red Hydrangea}}<br> | |||
{{name|White Bell Flower}}<br> | |||
{{name|Yellow Bromeliad}}<br> | |||
{{name|Yellow Nasturtium}} | |||
|} | |} | ||
The internal timer which triggers respawns is always running in the game background - it checks if there’s an available space and availability for a flower to spawn, if there’s room a single flower will spawn, then (regardless of spawning) the timer restarts. Respawn time isn’t influenced by when the flower is picked - a flower can respawn immediately if the internal timer lines up just after it’s collected. Because of this mechanic the respawn timer for the first flower picked will be a range - e.g. a flower on a 20 minute timer can respawn between 0-20 minutes - but each flower after that can be timed exactly by referencing the first flower's spawn time.<ref>[https://www.youtube.com/c/MintyPlush MintyPlush] - Advanced Foraging Guide - https://www.youtube.com/watch?v=DTVLDx_l6L0</ref> | |||
; Examples: | |||
*Player collects 4 of a 30 minute flower type. If respawn 1 happens at '''12:36''', respawn 2 will happen at exactly '''42:36''', respawn 3 at '''1:12:36''', and respawn 4 at '''1:42:36'''. | |||
*Player collects 2 of a 60 minute flower type. If respawn 1 happens at '''45:16''', respawn 2 will happen at exactly '''1:45:16'''. | |||
The sum of timers to fully respawn all flowers of a type & color is a maximum of two hours. | |||
Respawn timers in a newly unlocked biome may not work correctly until the entire biome has been cleared of the flowers initially. Biomes can have extra spawns when first unlocked, and these must first be removed for the biomes flowers to properly spawn in using the game's internal timer. | |||
==Dreamlight and Memories== | |||
There are three rotating [[Dreamlight#Dreamlight Duties|Dreamlight Duties]] directly related to Foraging: "Harvest 3 Fruit", "Harvest 3 Spices", and "Pick 3 Mushrooms". Foraging comprises its own tab of [[Dreamlight#Foraging|Dreamlight Achievements]]. There are 16 [[Memories]] consisting of 10 Memory Pieces each that can only be found by [[gardening]] or foraging (the '''Harvest''' action), though the Collection menu only explicitly indicates gardening.<!--Both harvested mushrooms and foraged fruits have been verified to yield memories labeled with "gardening".--> | |||
<div id="memorygallery"> | |||
{{Memory|WALL-E Memory 2|1|color=green|type=hidden|link=Memories#WALL-E}} | |||
{{Memory|Moana Memory 3|2|color=pink|type=hidden|link=Memories#Moana}} | |||
{{Memory|Ratatouille Memory 3|2|color=pink|type=hidden|link=Memories#Ratatouille}} | |||
{{Memory|Beauty and the Beast Memory 3|5|color=pink|type=hidden|link=Memories#Beauty and the Beast}} | |||
{{Memory|Wreck-It Ralph Memory 5|5|color=yellow|type=hidden|link=Memories#Wreck-It Ralph}} | |||
{{Memory|The Lion King Memory 1|6|color=blue|type=hidden|link=Memories#The Lion King}} | |||
{{Memory|The Little Mermaid Memory 5|7|color=yellow|type=hidden|link=Memories#The Little Mermaid}} | |||
{{Memory|Frozen Memory 5|5|color=yellow|type=hidden|link=Memories#Frozen}} | |||
{{Memory|Tangled Memory 1|1|color=blue|type=hidden|link=Memories#Tangled}} | |||
{{Memory|Monsters, Inc. Memory 2|10|color=green|type=hidden|link=Memories#Monsters, Inc.}} | |||
{{Memory|Toy Story Memory 4|3|color=red|type=hidden|link=Memories#Toy Story}} | |||
{{Memory|Nightmare Before Christmas Memory 1|7|color=yellow|type=hidden}} | |||
{{Memory|Encanto Memory 2|7|color=yellow|type=hidden}} | |||
{{Memory|Lilo & Stitch Memory 3|7|color=yellow|type=hidden}} | |||
{{Memory|Aladdin Memory 5|6|color=blue|type=hidden}} | |||
{{Memory|The Princess and the Frog Memory 4|7|color=yellow|type=hidden}} | |||
</div> | |||
==References== | |||
<references/> | |||
==History== | |||
{{history|1.0|Added}} | |||
{{history|1.1.5|Wild crops <!--(mushrooms, spices, etc.)--> now respawn in a different place every morning}} | |||
{{NavboxForage}} | {{NavboxForage}} | ||
{{SEO}} | {{SEO}} | ||
[[Category: Collections | [[Category: Collections]] | ||
Latest revision as of 02:14, 8 February 2024
| Foraging | |
|---|---|
| Information | |
| Type: | |
| Energy: | |
| Companion Friendship Reward: |
|
Foraging is an activity which involves collecting resources directly from the ground, or from trees and bushes. The Player can Hang Out with a Villager assigned the Foraging Role to increase the number of fruits and wild crops collected when harvesting.
Each area of The Valley has unique resources available to forage. After collecting a foraged item for the first time it will highlight as completed in the 'Foraging' tab of the Collection.
Foraged items can be cooked into meals, consumed to regain Energy, sold for Star Coins, or gifted to villagers to raise Friendship. Non-edible foraged items can be used to craft items.
Energy Cost
- Main article: Energy
It does not require any energy to Harvest or Pick Up items.
Villager Companions
When reaching level 2 Friendship with a Villager, they can be assigned a Role. Villagers who have been assigned the Foraging Role will gain extra Friendship when collecting foraged materials. They also have a chance to drop extra foraged materials when harvesting wild crops and fruits while they're following. Extra materials they produce will be dropped on the ground, and can be picked up by running over them. These bonuses only apply to items with the Harvest interaction label (e.g. Fruits, Mushrooms, Spices), not items with the Pick Up interaction label (e.g. Wood, Flowers).
Each level of friendship increases the rate which extra materials will drop. It's not only effective for leveling up Friendship with these characters, but extremely helpful for offering bonus materials when foraging. Be sure to always bring a Companion along when foraging!
Crafting Materials
A variety of resources can be found throughout the Valley - many which are unique to specific biomes. Some of these materials can be refined into higher level materials, which may be a component of a crafting recipe.
| Image | Name | Sell Price | Locations |
|---|---|---|---|
| Clay |
| ||
| Coal Ore |
| ||
| Cotton |
| ||
| Crystal |
| ||
| Dark Wood | |||
| Dream Shard | n/a |
| |
| Dry Wood | |||
| Gold Nugget | |||
| Hardwood |
| ||
| Iron Ore | |||
| Night Shard | n/a | ||
| Pebbles | |||
| Pixel Shard | n/a | Multiplayer | |
| Red Algae |
| ||
| Rich Soil | |||
| Sand |
| ||
| Snowball |
| ||
| Softwood |
| ||
| Soil | |||
| Stone |
| ||
| Amber | |||
| Bones | |||
| Copper | |||
| Oasis Glass | |||
| Pearl | |||
| Plastic Scrap | |||
| Quartz | |||
| Scales | |||
| Tin | |||
| Tropical Wood | |||
| Zinc |
Flowers
Flowers can be found in each biome growing wild on the ground. Each flower is unique to only one biome.
The distribution of flowers grown in each biome is not random; there is a set number of each type that will grow. Therefore, if you wish to collect a certain type of flower, you only need to pick that flower type in order for more of that type to spawn.
Beast's Greenhouse is an unlockable stall which supports flower gathering. It provides free flowers to collect at no cost.
Flower Types
Flower Spawning
After collecting all flowers of a type and color in a biome it can take up to two hours for them to fully respawn. The internal respawn timer for each type of flower is determined by its rarity - with the rarest (2 per biome) on a 1 hour timer and the most common (6 per biome) on a 20 minute timer.[2]
| Rarity | Max Spawns | Internal Timer | Flowers |
|---|---|---|---|
| Abundant | 6 Flowers per Biome | 20 minutes |
|
| Average | 4 Flowers per Biome | 30 minutes |
|
| Rare | 3 Flowers per Biome | 40 minutes |
|
| Ultra Rare | 2 Flowers per Biome | 60 minutes |
|
The internal timer which triggers respawns is always running in the game background - it checks if there’s an available space and availability for a flower to spawn, if there’s room a single flower will spawn, then (regardless of spawning) the timer restarts. Respawn time isn’t influenced by when the flower is picked - a flower can respawn immediately if the internal timer lines up just after it’s collected. Because of this mechanic the respawn timer for the first flower picked will be a range - e.g. a flower on a 20 minute timer can respawn between 0-20 minutes - but each flower after that can be timed exactly by referencing the first flower's spawn time.[3]
- Examples
- Player collects 4 of a 30 minute flower type. If respawn 1 happens at 12:36, respawn 2 will happen at exactly 42:36, respawn 3 at 1:12:36, and respawn 4 at 1:42:36.
- Player collects 2 of a 60 minute flower type. If respawn 1 happens at 45:16, respawn 2 will happen at exactly 1:45:16.
The sum of timers to fully respawn all flowers of a type & color is a maximum of two hours.
Respawn timers in a newly unlocked biome may not work correctly until the entire biome has been cleared of the flowers initially. Biomes can have extra spawns when first unlocked, and these must first be removed for the biomes flowers to properly spawn in using the game's internal timer.
Dreamlight and Memories
There are three rotating Dreamlight Duties directly related to Foraging: "Harvest 3 Fruit", "Harvest 3 Spices", and "Pick 3 Mushrooms". Foraging comprises its own tab of Dreamlight Achievements. There are 16 Memories consisting of 10 Memory Pieces each that can only be found by gardening or foraging (the Harvest action), though the Collection menu only explicitly indicates gardening.
References
- ↑ MintyPlush - Advanced Flowers Guide - https://www.youtube.com/watch?v=HkBg6ImIlfU
- ↑ MintyPlush - Advanced Foraging Guide - https://www.youtube.com/watch?v=DTVLDx_l6L0
